Dear Amy, (and anyone else who is new to quilting)
You asked me to do some tutorials teaching new quilters about the basics so I decided a little lesson was in order. I have made a project that I think you will enjoy making with step by step instructions that should make things a little easier.
This cute little basket holds a handful of coasters which can be easily made using a charm pack and it makes a Pretty inexpensive gift. So lets get started;
What is a charm pack?
 |
| A Charm Pack is a collection of 5 inch squares of a line of fabric. There are usually 42 fabrics in each pack but some packs have fewer pieces or more. Look at the back and it will tell you that if it is 100% cotton and how many pieces are included. Why do I want to buy a Charm Pack when it costs more than a yard of fabric at walmart? The answer is this....you get what you pay for. If you want to make something that will last you use good fabric. If it's for a craft or something that doesn't really need to be of good quality then go ahead and use a cheaper thinner fabric. It's really your choice. I haunt Joann's and occasionally buy some fabric at walmart but when it comes to making a quilt it's "quilt store quality fabric" all the way. Charm Packs usually cost about $8.50 to $9.50 so if you can get them cheaper you are getting a good deal. Some of my favorite places to purchase them are Missouri Star Quilt Company, they have a daily deal that can't be beat and Green Fairy Quilts, take a look at her blog while you're there and check out her fabulous quilting. Also check out Ebay or Etsy. As always please forgive my photography, I sew I don't take pictures...:) Lets make some Coasters; |
 |
| Each coaster uses 5 pieces of 5x5 inch charms. So the group you see used 25 charms. You can also cut your own fabrics using scraps or pieces of used clothing etc. Just cut them 5 inches by 5 inches. |
 |
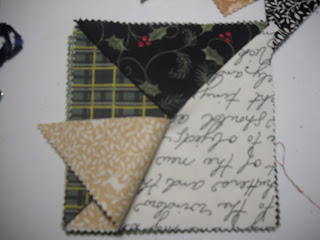
Now layer the pressed and folded charms with 2 across from each other, then weave in the third folded charm followed by the fourth. |
 |
| It should look something like this when it is laid out correctly. |
 |
| Pin Pin Pin Pin Pin all layers together including the batting on the bottom, make sure your batting is on the bottom if it isn't then put it there. |
 |
| Sew your coaster. It's best to use a 1/4 inch seam but if you aren't confident in that yet then you can make the seam bigger and the quilting police will never know :) I promise! |
 |
| Cut the corners off be careful not to cut into the seam. This makes the coaster less bulky in the corners. |
 |
| Ok now turn your coaster right side out, notice the batting is now in the middle and will be covered by all of the triangles. |
 |
| Now poke out the corners with a turning stick or a knitting needle, be careful using scissors sometimes they go right through. (Ask me how I know that little tip) :( |
I'd love to see your pictures so send them to me so I can give you all the praise you deserve.
Lots of people stop by but not many comment so if you like this tutorial and would like to see more please let me know by
1. Commenting on this post.
2. Be sure to tell me what beginners quilting topic you would like to see next?
All comments will be entered to win a Charm Pack of your own.
Summer Breeze by Moda...42 really pretty fabrics that just might remind you of spring in yellows blues and whites. Drawing will be a week from now Wednesday 12/21.


Cute coasters. I will definitely be making these! I would like a tutorial on how to attach the beginning and ending of the binding on the quilt. I've watched online tutorials, and I just don't "get it".
ReplyDeleteI love it! Thanks a bunch! Love the title. I can do that...I think. My next question is about the jelly rolls...once my sil tried to teach me to do a log cabin quilt block. The method was a mile a minute. Can you use jelly rolls for this? Awesome tutorial Vickie...keep it up.
ReplyDeleteLove your stitching and your tutorial. I have made coasters similar to this except the charms were folde in half and not on the diagonal. This makes for a more interesting coaster. Thank you so much for sharing.
ReplyDeleteHave a super great sewing and stitching day.
I really liked this tutorial. I need more instruction on doing bindings, especially the corners. Mine are always ugly.
ReplyDeleteReally liked your tute on the coasters, have seen them at craft fairs and flea markets so now I can make some for next Christmas.
ReplyDelete